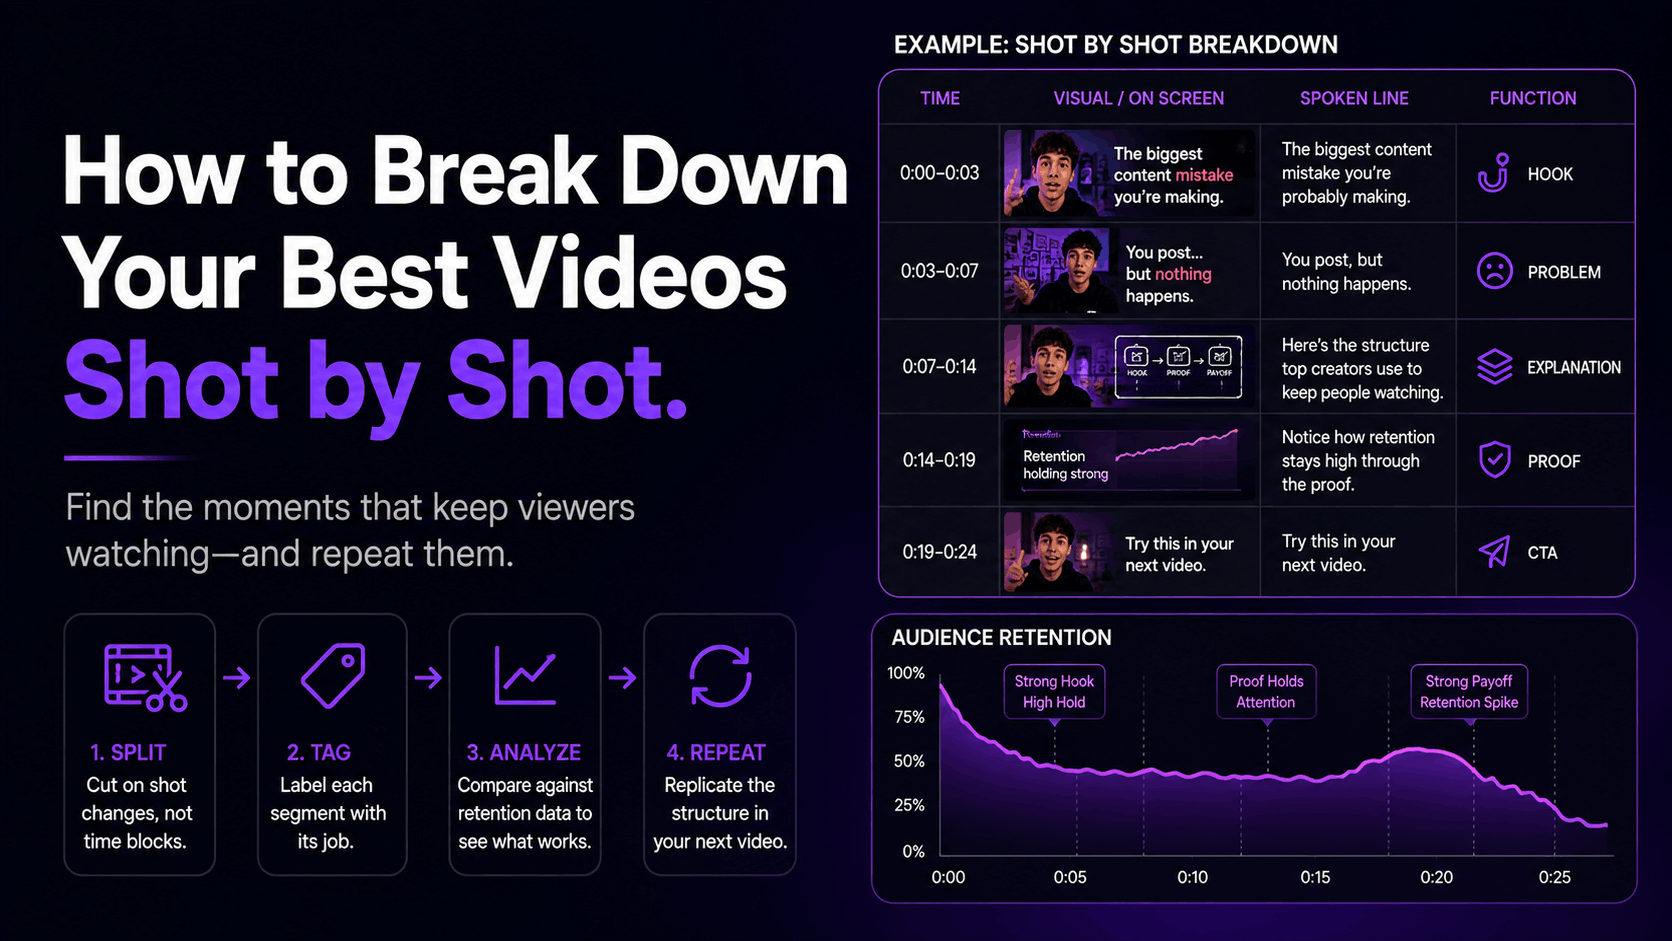
TL;DR: Reverse-engineering a viral video means splitting it into segments by shot change, tagging what job each segment is doing (hook, proof, payoff, etc.), then checking those tags against the retention curve to see what actually held viewers. You can do this by hand, or you can drop the video into Wave Vision and get the full storyboard breakdown, pattern detection, and an original concept built from what worked, in a few minutes instead of a few hours.
Every creator has a video that outperformed everything else they've ever made, and no real explanation for why. You know it worked. You just don't know what it did differently. Maybe it was the hook. Maybe it was the third shot. Maybe it was something that happened at second 11 that you've never even noticed.
That's the problem with "it just went viral." It treats a video's performance like a coin flip instead of what it actually is: a sequence of specific choices, each one either earning the next few seconds of attention or losing it. Shot-by-shot breakdown is how you find out which choices were which. Wave Vision's Storyboard Intelligence Canvas builds this breakdown automatically the moment you import a video, so this post covers both sides: what the method actually looks like under the hood, and how to run it in a few clicks instead of a spreadsheet.
Why "It Just Went Viral" Is the Wrong Way to Think About It
Virality feels random because most people only study the outcome (the view count) instead of the architecture underneath it. But structure repeats. A creator's best-performing videos usually share a skeleton even when the topics are completely different: the same pacing, the same proof placement, the same kind of pattern interrupt showing up at roughly the same point.
Researchers who've studied this at scale describe it the same way: once you've gathered enough data, you can reconstruct the architecture behind viral videos and find the common points across all of them. That's the whole premise behind shot-by-shot breakdown, and it's also the exact loop Wave Vision runs: import, analyze, decompose, compare, find the pattern, then generate a hypothesis you can actually go film. Evidence first, mechanism second, new video last. Not "make me something viral."
What Is Shot-by-Shot Breakdown, and Why Does It Beat Watching a Video Twice?
Shot-by-shot breakdown means splitting a video into its individual segments by timestamp, then logging three things separately for each one: what's spoken, what's on screen, and what the visual is actually doing. It beats "watching it a couple times and taking notes" because your brain naturally smooths a video into one continuous experience. Breaking it into segments forces you to notice the actual construction choices instead of just the vibe.
Watching a video twice tells you it felt good. A real breakdown tells you which specific segment made it feel good, which is the part you can actually reuse. Paste a video URL, upload a file, or pull straight from your connected TikTok library, and Wave Vision runs it through detection, transcription, shot analysis, and creative analysis, then hands you back a card for every segment: keyframe, timestamp range, spoken text, on-screen text, visual description, camera framing, and the creative function it's playing. Click any card and the video jumps straight to that moment.
How Do You Split a Video Into Segments?
Cut on shot changes, not on a fixed time interval. A new segment starts wherever the camera angle, on-screen text, or visual setup changes, whether that happens after 2 seconds or after 9. Most short-form videos naturally land somewhere between 4 and 8 seconds per segment once you cut this way.
If you're doing this by hand, write down the timestamp range for each segment, then a one-line description of what's visually happening, then the spoken line, then any on-screen text, before you interpret anything. Interpretation too early makes you fit the video to a theory instead of seeing what's actually there. This is the part that eats the most time manually, and it's also the part Wave Vision's pipeline handles for you: shot detection, frame extraction, and OCR run automatically, so the segment boundaries and on-screen text are already logged by the time you're looking at the storyboard.
A useful shortcut once you've done this a few times, by hand or otherwise: retention leaks at the shot level, not the idea level. A video can have a great script and still lose viewers if one segment sits on the same static shot too long, since the eye gets nothing new to hold onto.
The 12 Creative Functions Every Segment Should Be Tagged With
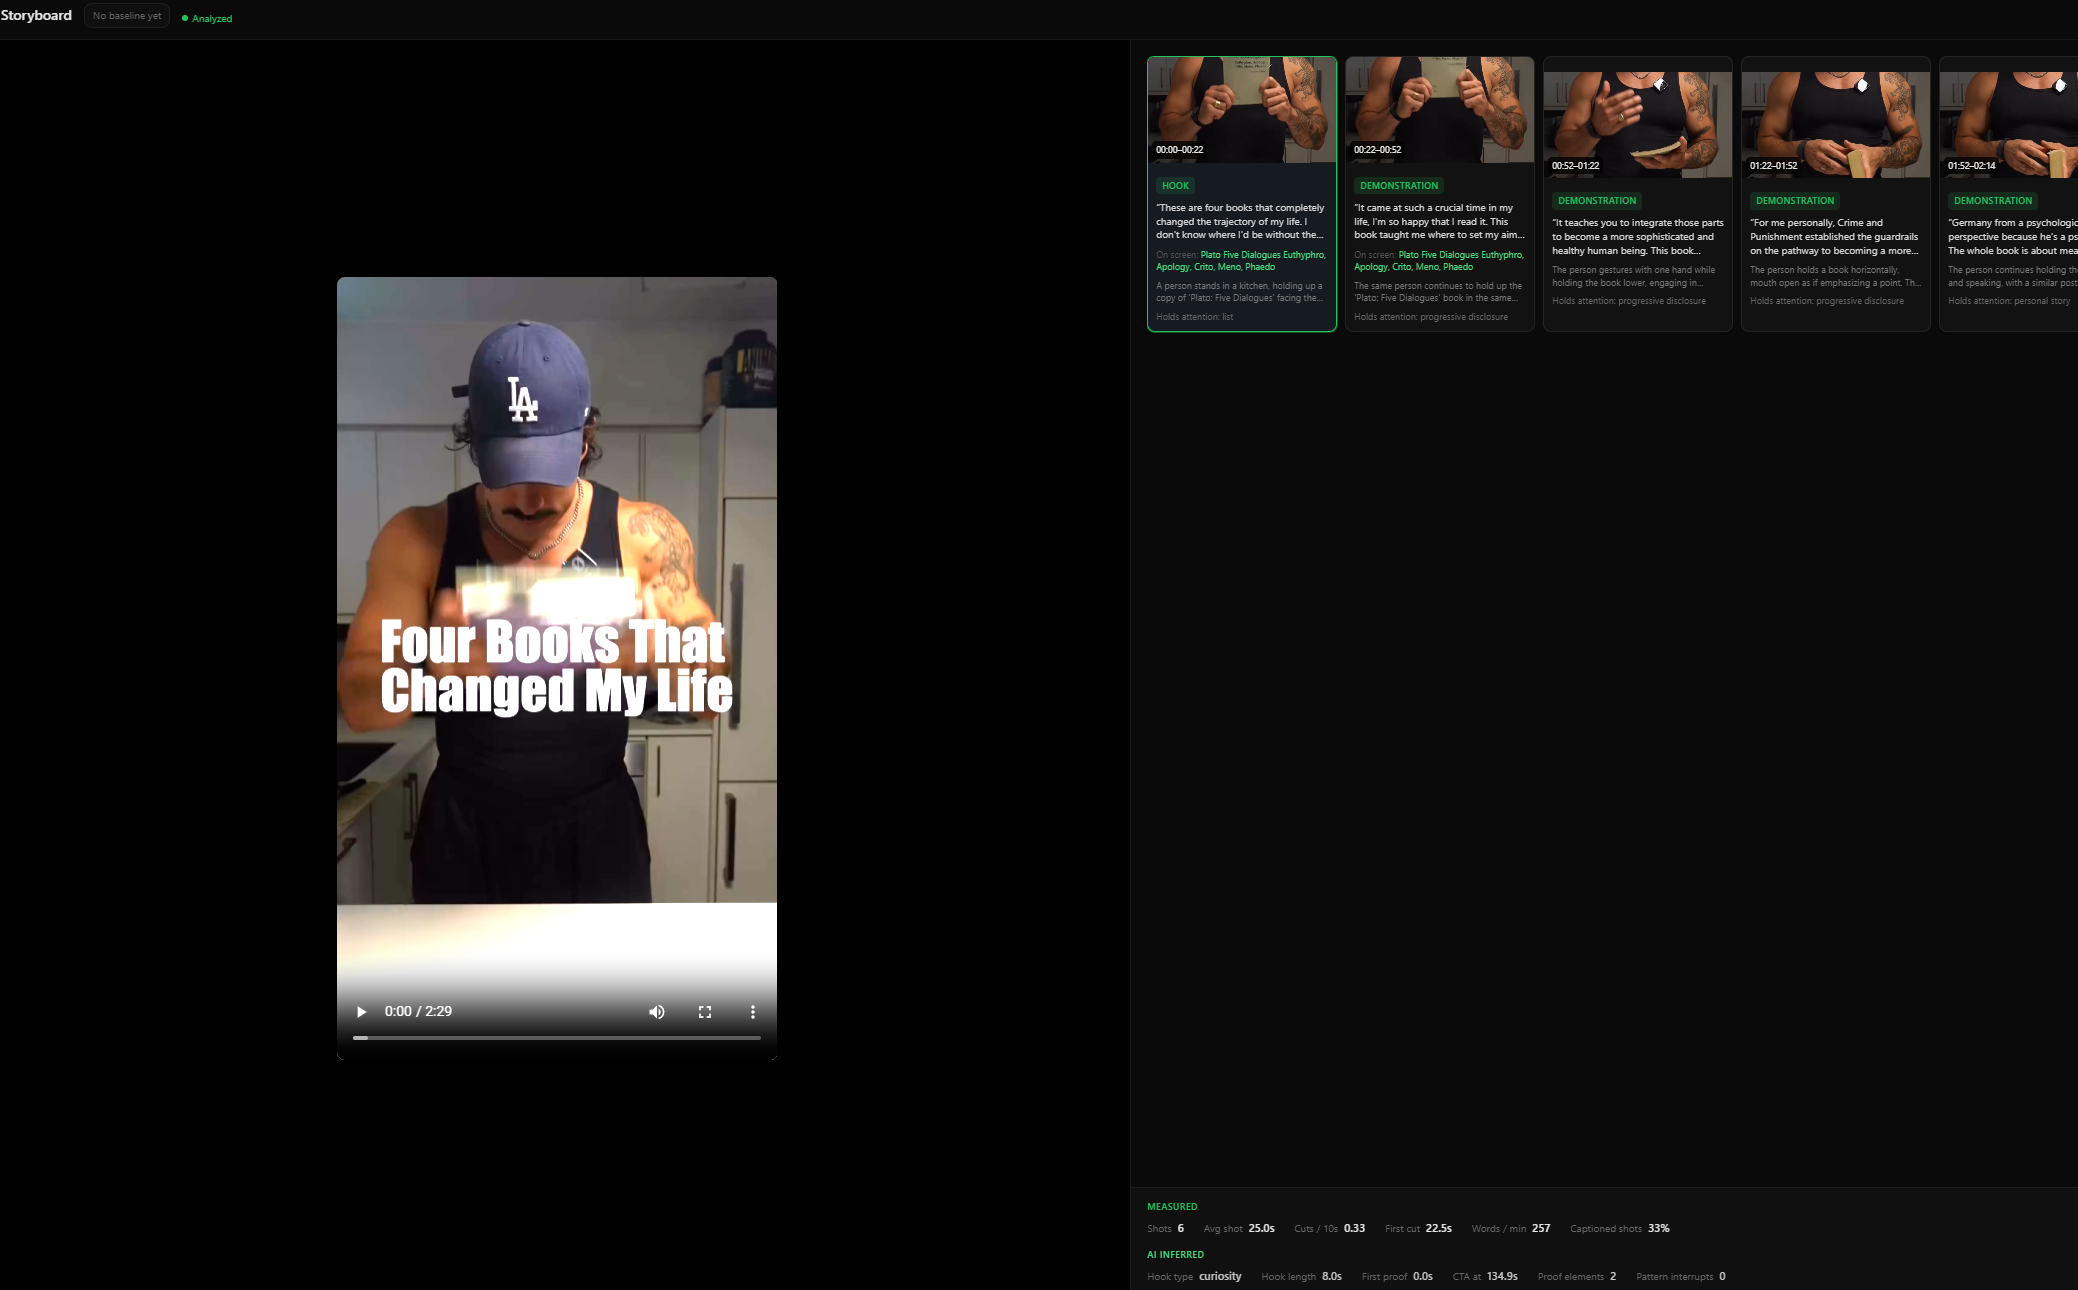
Once a video is split, every segment needs a tag for the job it's doing. These are the twelve you'll see over and over in high-performing short-form content, and they're the same twelve Wave Vision assigns to every storyboard card it generates:
- Hook – the reason to keep watching, delivered in the first 1-3 seconds
- Problem – the pain point or gap the video is addressing
- Setup – context needed before the value lands
- Context – background that frames what's coming
- Agitation – making the problem feel more urgent or relatable
- Demonstration – showing the thing happening, not just describing it
- Explanation – the "here's why" or "here's how" segment
- Proof – evidence the claim is real
- Social proof – other people validating the claim
- Objection – addressing the "but what about..." before the viewer thinks it
- Twist – a reframe or unexpected turn that resets attention
- Payoff – the reveal, the result, the thing the hook promised
- CTA – the single ask at the end
Most videos don't hit all twelve. That's fine. What matters is that every segment is doing something on this list, and that the segments carrying a pattern-interrupt flag actually line up with a retention gain. This is also where hook hold rate becomes useful: it's the specific number that tells you whether your hook segment is doing its job or just sounding like it should.
How Do You Know Which Segments Actually Worked?
Cross-reference your tagged segments against the video's retention curve, which shows exactly what percent of viewers were still watching at each second. A segment that holds flat or climbs is doing its job. A segment where the curve drops is the leak, no matter how good it looked to you when you were editing.
This step is what separates real breakdown from guessing dressed up as analysis. Effective pattern interrupts typically hold 65%+ of viewers past the first three seconds, and TikTok's own internal research found that pattern-based attention hooks increase completion rates by roughly 41%. If your hook segment isn't clearing something close to that, the problem probably isn't your topic, it's the segment itself.
Select two to ten videos in Wave Vision and its pattern finder does this cross-referencing for you: it returns the patterns that actually repeat, how often (3 of 5 videos, for example), a confidence score, and timestamped evidence linking each claim back to the exact storyboard card that supports it. A pattern with no evidence behind it gets dropped before you ever see it, so what's left is the retention curve by timestamp data actually backing the pattern, not a guess dressed up as one.
The 4 Proof Types That Show Up in Almost Every High-Performer
Proof segments aren't optional filler. They're the difference between a claim the viewer has to trust and a claim the viewer can see for themselves. Across most high-performing short-form content, proof shows up as one of four types:
- Screenshot or on-screen result – a number, a chart, a before/after image
- Live demonstration – the thing happening in real time, not described after the fact
- Before/after comparison – a single shot showing the transformation directly
- Testimonial or social proof – someone other than the creator validating the claim
Timing matters as much as the proof type itself. The strongest structures tend to place proof and demonstration between roughly the 15 and 25 second marks, after the hook has already earned attention but before the CTA. Proof that shows up too early competes with the hook. Proof that shows up too late doesn't have time to land. Wave Vision's creative analysis layer tags all nine proof types automatically (screenshot, product demo, analytics dashboard, testimonial, numerical result, and more) against their exact timestamp, so checking proof placement across your winning content is a filter, not a rewatch.
Turning a Pattern Into Your Next Video
Finding the mechanism is only half the job. Once Wave Vision's pattern finder surfaces a repeating structure, its concept generator can turn that pattern into an original idea built for your own brand, complete with a filmable production storyboard: spoken line, on-screen text, camera framing, camera movement, and b-roll notes for every segment. Two guards run on the output before you see it, one checking that the structure transfers without borrowing anyone's actual wording, and one checking the concept against your brand's prohibited claims. That's the difference between breakdown as a research exercise and breakdown as something that turns into your next post. If sound selection is part of what made the original work, that gets logged too, since audio choices show up in retention data just as clearly as shot changes do.
The Takeaway
Reverse-engineering a viral video isn't about copying it. It's about finding the mechanism underneath the topic so you can reuse the mechanism on something original. Segment by shot change, tag each piece with its job, then check your tags against the retention curve instead of your memory of how the video felt.
You can run this whole process by hand on your best-performing post from the last month. Or you can start a $1 trial of Wave Vision and get the storyboard, the pattern, and a filmable concept back in minutes.
Frequently Asked Questions
**How long should each segment be when breaking down a video?**There's no fixed length. Cut a new segment wherever the shot, on-screen text, or visual setup changes, which usually lands somewhere between 4 and 8 seconds for short-form content. Cutting by shot change instead of a fixed timer keeps you honest about what actually happened in the video.
**What's the difference between a hook and a pattern interrupt?**A hook is the reason to keep watching, usually a promise or a question stated in the first few seconds. A pattern interrupt is the visual or audio shift that breaks the viewer's scroll autopilot long enough for that hook to actually register. A video can have a strong hook line and still lose viewers if nothing on screen interrupts the pattern first.
**Do you need the transcript, or just the visuals?**Both, and logged separately. Spoken words, on-screen text, and the visual itself often carry different information, and viewers watching with sound off only get two of the three. Breaking each segment into all three layers shows you where they reinforce each other and where they don't.
**How many videos should you break down before you see a pattern?**Five is usually enough to spot a repeating structure, though more gives you a stronger signal. Wave Vision's pattern finder works across two to ten videos at once, so you can test a pattern against your whole recent catalog instead of just a couple of posts.
**Does this work for long-form YouTube too, or just short-form?**The method works for both, but the segment count and proof placement will look different. A 10-minute YouTube video needs its proof and pattern interrupts spaced across the full runtime instead of packed into the first 30 seconds the way short-form content is.
Frequently asked questions
How long should each segment be when breaking down a video?
There's no fixed length. Cut a new segment wherever the shot, on-screen text, or visual setup changes, which usually lands somewhere between 4 and 8 seconds for short-form content. Cutting by shot change instead of a fixed timer keeps you honest about what actually happened in the video.
What's the difference between a hook and a pattern interrupt?
A hook is the reason to keep watching, usually a promise or a question stated in the first few seconds. A pattern interrupt is the visual or audio shift that breaks the viewer's scroll autopilot long enough for that hook to actually register. A video can have a strong hook line and still lose viewers if nothing on screen interrupts the pattern first.
Do you need the transcript, or just the visuals?
Both, and logged separately. Spoken words, on-screen text, and the visual itself often carry different information, and viewers watching with sound off only get two of the three. Breaking each segment into all three layers shows you where they reinforce each other and where they don't.
How many videos should you break down before you see a pattern?
Five is usually enough to spot a repeating structure, though more gives you a stronger signal. Pick your best performers rather than a random sample, since the goal is finding what your top content has in common, not describing your average post.
Does this work for long-form YouTube too, or just short-form?
The method works for both, but the segment count and proof placement will look different. A 10-minute YouTube video needs its proof and pattern interrupts spaced across the full runtime instead of packed into the first 30 seconds the way short-form content is.